
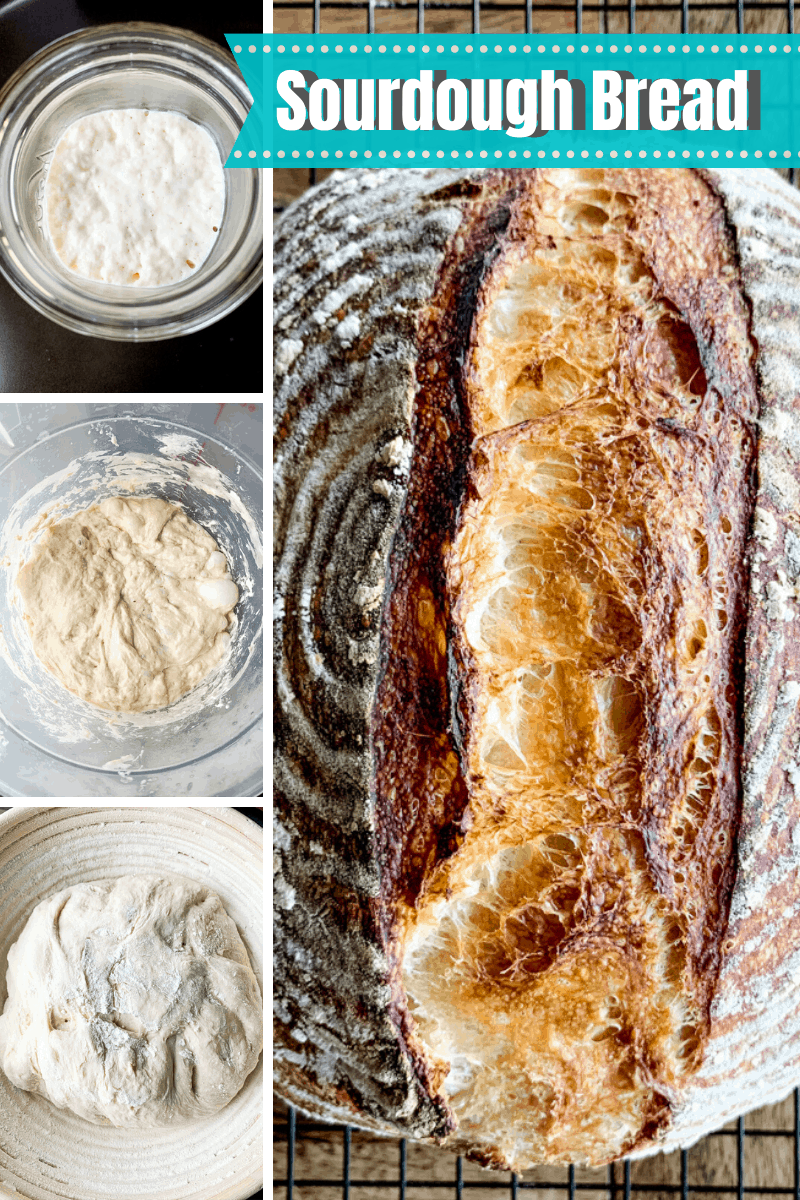
Sourdough bread has a thick, chewy crust and soft, airy interior. It is comforting, savory and so easy to make using only flour, salt, and water. Learn how to make your own starter, maintain it, and turn it into a loaf.
We know many people are looking for an easy introduction to sourdough, without worrying about technique, so consider this your introductory lesson to making sourdough starter and bread from scratch. There are many methods and recipes for sourdough out there, and we are just focusing on one simple method. If you graduate from this and want to get fancy, there is a lot more to try out with sourdough baking!
The most important first step is to have a sourdough starter. You might already know someone with a starter, and if so, you’ve got an easy head start! You don’t need a lot, just get a couple of tablespoons and then immediately feed. If you aren’t lucky enough to have family or friends with an active sourdough starter, you can make your own from flour, water, and a bit of patience.
Making Your Own Sourdough Starter:
Wild yeast lives in the air and flour, it’s everywhere really! Breads made from wild yeast do not require commercial yeast. To make your own wild yeast sourdough starter
- Fill a larger plastic or glass container with 1/2 cup flour and 1/2 cup water. Stir until thoroughly combined into a smooth batter.
- Cover with a loosely screwed on lid or plastic wrap.
- “Feed” your starter 4 ounces of water and flour, stirring until combined, every 24 hours.
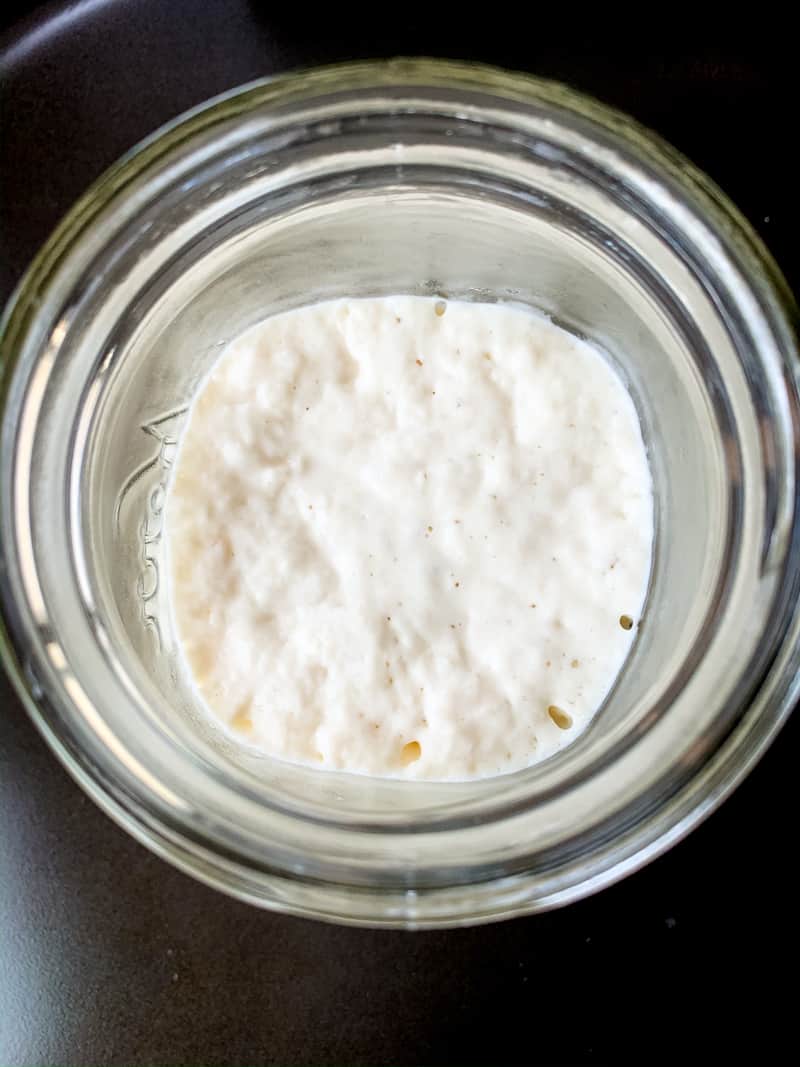
- Notice any air bubbles day to day, both large and small, that means it’s working and the wild yeasts are doubling! It should start to smell sour after a few days, but room temperature can affect how quickly it activates. Don’t worry too much about it, just keep feeding it every day. The texture will change from a pancake dough batter to an airy, lighter batter over the first 5 days.
- By day 5, or once it smells sour and is airy and doubling in volume, it is ready to use in your preferred sourdough bread recipe!
Sourdough Starter Maintenance
If you bake bread often, you can leave your starter on the counter and feed daily to keep it active. We like to feed 5 Tablespoons of both flour and water. You’ll find that your jar can’t contain that much starter, as it will double in size each time you feed it. You can either discard a bit of starter before each feed, or you can save it and use in waffles, pancakes, pizza dough, or even fry up that discarded starter in oil and add some seasonings as a delicious, sourdough ‘pancake!’ Just always make sure to leave at least 2 tablespoons of starter behind to continue to feed. You never want to use it all up.
If you want to only make bread once each week or less, keep your starter stored in the fridge. 2 days before you’re ready to make bread, remove it from the fridge and feed and leave on the counter. 24 hours later, feed it again. It could take anywhere from 2-5 hours for the starter to be fully active and ready to use after that second feed. Once it is fully active and doubled in size, you are ready to bake. Make sure to feed your starter after each discard or use.
Using Your Starter: Making the Dough
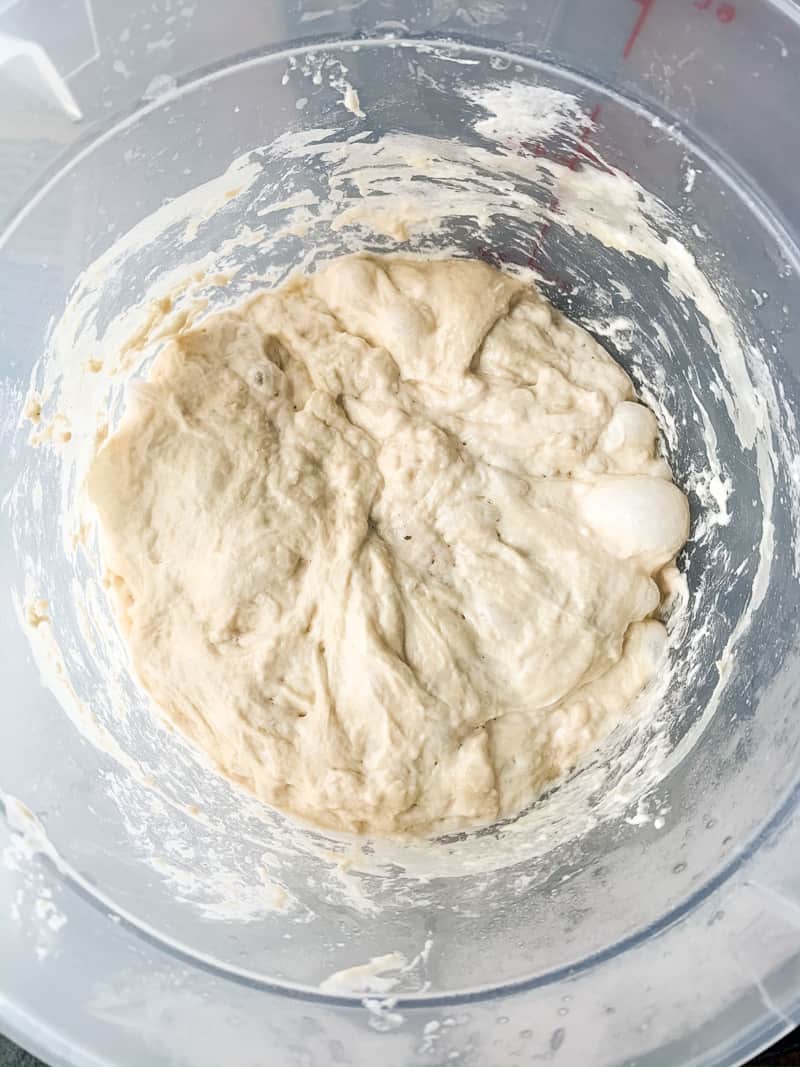
Now that your starter has doubled in size and is billowing at the top, you are ready to make your bread dough. We like a larger loaf, so mix 5 cups of flour with 2 cups of water. Either all purpose or bread flour will work, though we prefer bread flour. You can start mixing with a wooden spoon if you like, but you’ll realize pretty quickly that a spoon will only get you so far, and you’ll want to switch to just mixing by hand. The dough will be really sticky and thick. Let the dough rest for 45 minutes with a lid on or covered in plastic wrap. This resting process where gluten development begins is called the autolyse.
First Rise
After 45 minutes, add in 1 Tablespoon salt and 1/2 cup of your starter to the water/flour mixture. Mix this all in by hand until well combined, but do not knead. Let it rise for anywhere from 12-24 hours. In the winter, when the house is cooler, we let this rise for about 20 hours. In the summer, we stick fairly close to 12-14 hours. You just want it to double in size. Without adding any commercial yeast, this can be a fairly long process, so we tend to do this first rise overnight.
Second Rise
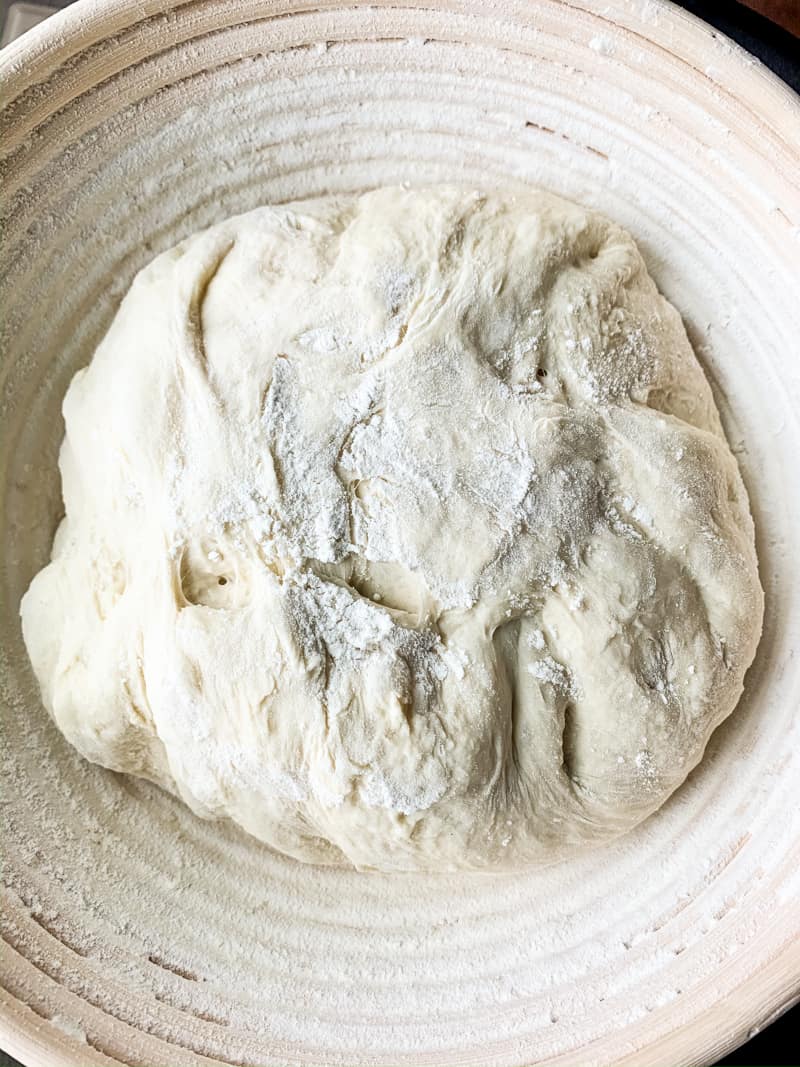
Once the dough has doubled in size, dump it out onto a clean, floured surface and fold it over a few times into the center. Transfer this to an oiled bowl or to a floured proofing basket. Let it rise for 3-5 hours. You’ll know it’s ready when you poke it with your finger (not too harshly) and the indent remains, or only very slowly springs back while still leaving an indent. If the dough springs right back, it needs more time to rise.
Baking
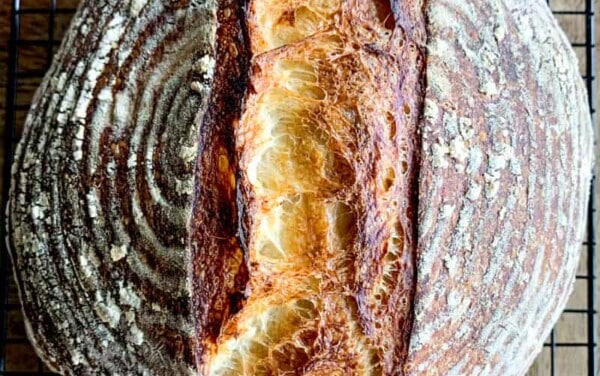
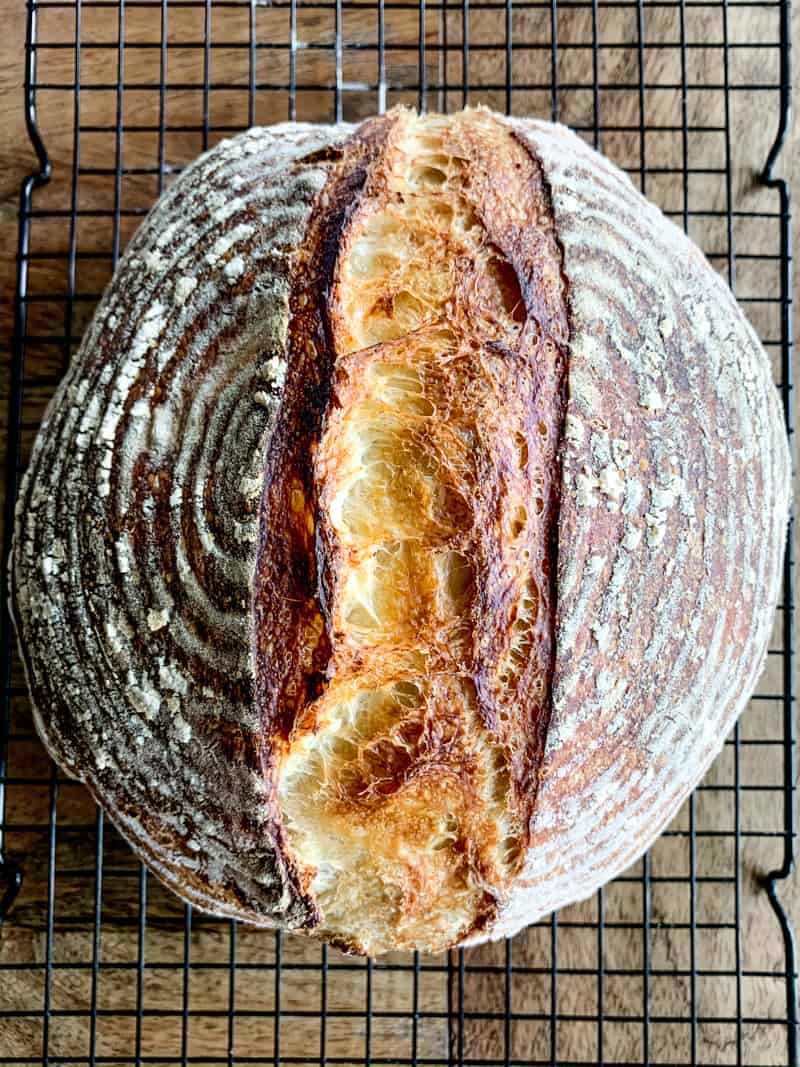
Once your dough is fully risen, preheat your oven to 450 degrees Fahrenheit with your dutch oven in the oven for the entire preheating time. Flip your dough from your basket/bowl onto a large piece of parchment paper. Use that excess parchment paper to help lift the dough into the dutch oven. Put lid on and bake for 30 minutes. After 30 minutes, remove the lid and continue to bake until bread is a deep brown, approximately 30 more minutes.
PRO TIP: Put a baking sheet under your dutch oven when you remove the lid, and bake for the remaining time this way. This will ensure the bottom of the bread doesn’t get too dark or burn.
Once the bread is a deep brown, turn off oven and crack the door. Let your bread cool in the cracked oven for 20 minutes before removing from oven and dutch oven, and putting on a cooling rack. Cutting into a warm loaf of bread is SO tempting, but it is important to let the bread cool completely to allow texture and flavor to develop completely.

I’ve now made three batches of this bread. I don’t have a dutch oven, so I did the first one in a stone cake pan. It browned nicely, seemed to be a good size, and sounded hollow when I did the thump test. When I cut it though, it was not properly cooked. Today I mixed two batches. I followed the test for second rising, and was satisfied the dough had risen properly. I baked these loaves in a large cast iron pan, placing a smaller, ice-cube filled cast pan below the baking pan. I started one batch considerably after the second, so each loaf baked alone. Both browned beautifully, sounded hollow…but again, both are doughy inside. The first time, I used convection setting, but when I realized the humidity is a factor, I opted for standard baking. I’m baffled. I’ve been baking yeast breads for decades, but really like the taste, texture and digestibility of sourdough. Please advise.
Your comment did not specify if you had a lid on your cast iron pan while baking. If not, that would be our first suggestion to try baking with a lid. It is also possible that your oven runs a little on the cool side. Most ovens are a bit off to some degree. We recommend using an oven thermometer to check the accuracy of your oven’s temperature when baking.